Sonntag, 29. März 2009

The mirror tripple ko

.
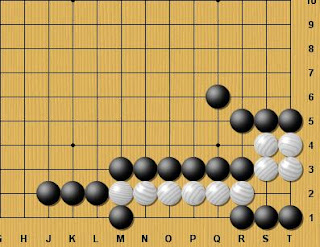
Something really funny happened during the Insei-games of this weekend. John and I were enjoying our break when Flavien suddenly approached us brabbling something of the occurence of a triple ko. We stopped our game and headed for the table where two D-class Insei were playing. In fact they produced a very complex situation in the center of the board which could not be resolved by either player -a triple ko. A lot of people gathered around the board including the Pros supervising the Insei classes. It was around this time when John noticed something else: Not only was the situation on the board a triple-ko, it was also pefectly symmetric: A mirror tripple ko.


(Note: If you take a second look you will notice that some moves in the centre have not been copied perfectly -so it is not accurate mane Go )

Mittwoch, 18. März 2009

A good performance

.
Hi there!

Since the first weekend of March was quite disapointing -with me only being able to win two out of my 8 games against the weaker half of the class (Nr. 8-16)- I was hardly expecting anything from the second one. Fortunately I was able to win my games against the two weakest players in the class but after this I had to go up against the top 6. Surprisingly I did do a good job (from my point of view) -by beating Nr. 1, 3 and 6.
Especially my game against the top ranked Insei in our class was totally unexpected. Still I feel that it was an interesting game -with him trying a new move in the opening. Here it is (I added some commentaries by Komatsu Hideki 9p -who gave some short comment on the fuseki. More commentaries -hopefully by Kenmochi Jyo-sensei will be added later).


Dia 1: A new move.

I played with the white stones.

Up to 20 the opening is classic but 21 breaks away from the common Joseki starting a complicated capturing race in the corner.
Together with some stronger Insei we discussed the moves of 22 at 27 (which is very complicated but seemingly not totally out of question) and 36 at 40.
However Komatsu Hideki-sensei did note that the result up to 41 is not at all bad for White, since the corner area is rather small (about 17 points) and Whites outside shape is thick. I was happy to see, that he did agree with my way of playing. Anyway 42 is bad. It should be one space below 49. In the game 49 became a very good move. 50 on the other hand seems to be a little too slow. The sensei did understand my desire to play a reinforcement here but it is just a little passive.


Dia 2:


52 is big. 55 is the losing move (well, that is my opinion). It was noted that it would be better played at 69 -the reason being the nice tesuji of 56. After 56 it is hard for Black to find a fitting answer. In the game White got a chance to further his attack with the good moves of 62 and 64, giving him a strong outside shape which in turn enables White to attack blacks group on the right. Still W's way to go about this attack (trying to attack the whole thing) is questionable. It would be enough to split the two groups and capture two stones at the top. Also Black missed his chance when he answered at 81. Instead of this it would be better to play at 89 after which White will have a hard time finding a good defending move.

.
.
.


Dia 3:

By the time I played 100 in the previous Dia I already had used up my 30min of thinking time, meaning, that I was now in a 30sec Byo Yomi. The other player entered Byo Yomi a few moves later, leading to a tense endgame with many mistakes (for example 143 was played out of time trouble -he had to make a move as there was only 1sec of his time remaining).

After 108 W is ahead.

149 is another mistake caused by a lack of time...


Dia 4:

Of course W does not have to block at 153 but can instead give way with 152 rescueing all of his stones.

In the end White won by 14,5 points.


Montag, 23. Februar 2009

Interesting new moves

.
.
Hi everybody! During the last few weeks I spent a lot of time replaying recent pro games and -as expected- found a lot of innovative new ideas and patterns which I want to share with you. Some of those I already studied in detail and I might give my conclusions later. For starters I just want you to check out the beauty of pro-thinking in the following diagrams.


Dia 1: A funny jump

This game was played as a part of the 2nd Japanese Yugen Cup at the 12th of January 2009. The players are Osawa Kenro 1p (White) and Kato Atsushi 8p (Black).

Black 7: Normally Black 7 is played at the lower edge, mostly at K4 which would form the famous "Kobayashi Koichi" opening. Here Kato decided to develop more rapidly, jumping directly to 7 which is consistently followed by the tsuke at 9 and the pushing moves of 15-21.

As a result Black 7 looks just perfect and Black won the game by 3,5 points.


.
.

Dia 2: Breaking away from the conventional Joseki -a strong hane


This game is was played during the 3rd round of the 9th Chinese Ricoh Cup (8.2.2009). The players are Shi Yue 4p (White) and Sun Tengyu 3p (Black).

White exchanged 8 for 9 before attaching at 10 which is in itself still quite a new move, even though we have seen it for some years now.
As the ladder favors Black he wants to play the Joseki given below, trying the Hane at 11.
However White played 8 considering this possibility and counters with the severe Hane at 16.

Now there are quite some variations but as Black does not back off the fight results in a ko.


.
.
.
.


Dia 2.1:

Up to 40 White takes the ko, giving him an extremely thick position on the top. Of course after 42 the game is still difficult, but based on what I think and -more importantly- what a pro I asked about this thinks, we can say that the result is better for White.

As a result W also won the game by 2,5 points.


.
.


Dia 3: Push, Cut, Fight

The last game I want to show you today was played by Ding Wei 9p (White) and Zhou Heyang 9p (Black) as part of the 23rd Chinese Tianyuan Tournament (13.2.2009).

The opening up to the attachement of 14 is often seen in actual play, but recently some pros try the push and cut of 15 and 17 setting up a difficult fight.

The most important part is, that W can not use 32 to kill Black at 33 because the semiai in the corner will either result in ko or Seki which is both bad for White as Black already took the Ponnuki with 31. Black forces with 35 before playing the nice Tesuji of 37. Now W has to play 38 at the top because Black could play there blocking Whites path in Sente, which is inconceivable. However the general opinion seems to be -at least among the Japanese Insei- that this result is quite good for Black as Ws group on the right side is still weak and Black got a very strong ponnuki.

Black won this game by resignation.

Dienstag, 3. Februar 2009

Doing Tsumego with a pro

.
Today once again I went to the Nihon-kiin to study Go. As I said before I am currently focussing on tsumego. When I have trouble finding the correct solution I sometimes ask professionals for help, but it's kinda depressing if you ask me, for the pros find all the correct solutions instantly. I'll just give you two examples:


Problem 1:

It was still early in the morning (11 am =P) when I entered the room at the 7th floor of the kiin, which is reserved for insei and professionals. I saw a pro who also gave me a hand for the joseki research presented in the last post sitting all alone reading the new issue of "Go weekly". I said my "konnichiwa" and sit down next to him, starting to do tsumego. When I laid the stones for my first problem (the one to the right) down on the board he had a short glimpse at it, immediately said "easy" (one of the few English words he knows) and then continued to read his newspaper.

Actually I found the problem not easy at all. Please try for yourself. It's black to kill.


.
.
.

Solution 1:

After like 6-7 min I still could not find the correct answer and felt quite bad, because the pro obviously read it all out in an instant. I did one more attempt and after I failed again I asked the sensei to help me out. He asked for my best way and claimed that the first two moves where correct, then leaned back again to read the Go news.


After another few minutes I started to ask myself how pathetic it could get, but even though I asked one more time the pro just answered that it was too easy for him to help me.
When I finally did it I had spent more than 10 min on this problem though it is really not particularly difficult.

The pro smiled.


Problem 2:

Seeing the huge gap in out reading abilities I decided to test him with the most difficult tsumego I had in mind. I remembered that even a group of E and F-class Insei could not solve it. It took a C-class level Insei to finally do so.

If you don't have something else to spend your time on you can go and try for yourself without looking at the solution.


Solution 2:

I was happy, that he did not answer instantly.
When he stoped reading and leaned back, closing his eyes and thinking hard I was actually smiling, remembering all the trouble I had with this problem -especially finding the first move.


Unfortunately my happyness did not even last one minute, when the pro said: Ko.
And what shall I say other than: Yes he is correct.

What we can learn from this: Don't challenge a professional for a tsumego-match.


.
.
.

The idea of 9 sacrificing as many as six stones seemed amazing to me, but the pro did not even falter for a second when showing me his solution.


.
.

It ends in a ko.

The final comment of the pro, when he learned that it was one of the most difficult tsumego I have in mind: Chotto muzukashi. (A little bit difficult)

Samstag, 31. Januar 2009

An interesting Joseki variation 2

.
.
I wanted to post this for a long time now, today I'll finally do it.
In a discussion with John and Flavien about a Joseki I remembered a move my teacher in Berlin played once. I showed it to them but even though we invested quite some time in checking all the variations we could not come up with a definite solution. Anyway I did continue our research using Moyo Go, finding four games in which our move was actually played.
Still it was impossible for me to understand why the pros did play the way they did. Thats when I decided to just go and ask them. The following diagrams are therefore not only based on the discussion with John but also on the opinion of three professionals.

Dia 1: The basic Joseki.

The moves up to 13 are common knowledge, 14 is one possible way to continue. Normally the ladder should be good for White otherwise the cut at A becomes a big problem. Regardless of this Black will probably cut at A next -


Dia 2: The cotinuation

The sequence up to 29 is a joseki. Note that White can't pull out his stones without a favorable ladder after the sequence of White A, Black B, White C, Black D.

Even though the moves here form an established Joseki there are some interesting variations -


Dia 3: The Kagetsugi

For example Withe could choose to kagetsugi with 6 in this diagram. I remembered my teacher playing this move putting me into big trouble.

Naturally black has to defend his stones at the top -


Dia 4: Pro Game

He can do this with 2-14 in the dia to the right.

This sequence is taken from a game between Sakata Eio and Kataoka Satoshi and we could call this result about even.

However the question comes up if it is really nececcary for Black to crawl on the second line up to 10 or if he can capture the corner stones before.


Dia 5: Capturing the corner stones

Indeed all the professionals confirmed that it is possible for Black to capture the white stones without having to spend an additional move on the second line.
Note that 3 is the Tesuji in this position. 6 and 8 are about the best that White can do but still he is losing the semiai by one move after 13.

Even though this is possible it did not happen in any of the games I found using Moyo Go.

According to one of the pros I asked about this it is because Black has to take all the White stones of the board which means that his capture will be not as big as it seems. Moreover Black will end in Gote.

The point of Dia 4 is that after 10 Black would already be locally alive if White used 11 to continue to push at the top, for this reason Black would not have to add any moves in the corner giving him a superior result. Thats why White plays 11 in the corner, saving his group there.


Dia 6: Testing the new move in an actual game

After all those studies I felt like testing the new move in an actual Insei-game.
Obviously my opponent didn't know about this variation and so he spent a lot of time here, finally coming up with the mistake of 27. Anyway I was so happy to capture the four black stones on the left that I did not think before playing the atari of 30, which is one of the reasons why I lost this game. In fact it would be good for Withe to just play 30 at 32 for the ladder is good for White. In this case Black could not do much but playing a ladder break which White would ignore to secure his capture in the upper left corner. If White did play 30 at 32 the game would be clearly favourable for him. Anyway after the bad exchange of 30 for 31 Black set up a perfect sacrifice with 33 and 35, enabling Black to close White of in Sente, giving him tremendous outside thickness. (Note that the three white stones are lacking liberties so Black can force White to capture the four black stones at any time.)

Even though this game was a failure I think I will try the Kagetsugi again in the future.
I hope we can study together then once again.

Sonntag, 18. Januar 2009

.
.
An dieser Stelle gibt es also endlich mal wieder eine ausführlich kommentierte Partie zu sehen. Der Grund für die lange Pause waren die vielen, vielen Feiertage, die in diese Jahreszeit fallen. Da gab es den Kaisergeburtstag, Weihnachten und natürlich Neujahr -den wichtigsten Feiertag der Japaner. Diesem, für dieses Land sonst vollkommen untypischen Müßiggang, fielen gleich mehrere der freitäglichen Studiengruppen, um Kenmochi Jyo 7 pro und O Meien 9 pro zum Opfer. Letzten Freitag fand dann endlich mal wieder ein Treffen statt und Kenmochi kommentierte in gewohnt drastischer, wie unterhaltsamer Weise eine meiner Partien vom vorletzten Wochenende. Mein Gegner steht in der F-class derzeit auf Platz 6 (von 16) und damit eine Position unter mir -es versprach also ein spannender Kampf zu werden.


.
.
.
.
.
.
Dia 1:
.
9:

K: Dieser Zug zeugt von schwachem Kampfgeist. Natürlich ist die Sequenz bis 12 eine Art Joseki, aber es fühlt sich einfach natürlich an, auf A zu schneiden.

D: Ich wollte einen komplizierten Kampf vermeiden. Außerdem steht Schwarz mit 5 am oberen Rand sehr solide da, was bedeutet, dass es für Weiß schwer sein dürfte, dort Gebiet zu bilden.

Y (Yuho?-sensei): Aber ein Kampf ist doch für beide Spieler kompliziert, du musst also keine Angst davor haben und wenn du meinst, mit 5 oben stark zu sein, dann ist das nur ein Grund mehr, dort zu kämpfen.

13:

K: Das ist klein. 12 steht genau richtig, um eine weitere Entwicklung dieses Moyos zu verhindern. Am Besten wäre, 12 auf 32 zu spielen. Der untere Rand ist noch vollkommen offen und außerdem hat Schwarz bereits einen Stein auf 11, weswegen Weiß nach einem schwarzen Zug auf 32 nicht auf viel hoffen kann.

17-26:

D: Ist 18 nicht schlecht, wenn Schwarz 17 hoch gespielt hat?

K: Nein. Wieso? Natürlich gibt es auch das Joseki in Var. 1 (rechts), aber wen interessieren schon Joseki? Wichtig ist nur, nach S19 auf B rauszugehen. Ansonsten kann Weiß Schwarz -wie in der Partie- mit 21 einschließen. Bis 21 ist es also gut für Weiß, umso mehr, als dass der untere Rand wie gesagt sehr groß ist, der größte Fehler ist aber S24.

D: Sollte man 24 auf 25 spielen?

K: Baka! Man sollte einfach auf C verbinden. Wenn Schwarz dann B spielt, hat Weiß Sente, während er in der Partie mit 26 in Gote endet.

27:

K: Wenn du zwischen 6 und 22 wählen solltest. Welcher Stein wäre wohl wichtiger?

D: Ähm...

K: Natürlich 22 !! 22 trennt die beiden schwarzen Gruppen und ist somit viel wichtiger, als 6. Dein Zug auf 27 ist also schlecht. Man sollte zum Beispiel auf 35 spielen, das würde 22 vorerst unbrauchbar machen.

31-33:

K: Ahh. Sehr gut, sehr gut. Die Weiße Gruppe im Zentrum ist immer noch wirkt immer noch sehr unstabil.

D (freut sich ob des seltenen Lobs): Wie wäre es denn, 33 auf 35 zu spielen? Dann wäre Weiß...

K: BAKA!! NEIN !! Ich hasse Nozokis (peeps)! Was machst du denn, wenn Weiß, statt deinen Plänen zu folgen und auf 36 zu verbinden, mit 38 rausgeht??

D (geknickt): Oh...ja...das ist natürlich gut für Weiß...

35:

K (schaut böse): Und was hat dein Gegner gespielt?

D (zeigt auf 36): Er hat hier verbunden...

K: Noch so ein Idiot...

38:

K: Jetzt stellt sich natürlich die Frage, wie man weiter angreifen sollte...entweder 39 oder D? (haut einen Stein auf D) Wenn man hier spielt, dann gibt es natürlich ein Problem mit dem Tsuke auf E. Stimmts?

D (hatte weder an D noch E gedacht): Also..ja..ähm...nein...also...

K: GIBT ES EIN PROBLEM MIT DEM TSUKE AUF E ODER NICHT ??? (Um solcherlei herauszufinden, wird in unserer Studiengruppe normalerweise einfach ausprobiert . Daraus ergaben sich die Varianten 2 und 3, wobei Kenmochi mit Weiß angriff -ich sollte verteidigen.)

.
.

K: Weder Variante 2 noch Variante 3 sind gut für Schwarz. Das zeigt, dass Tsuke mit 40 tatsächlich ein Problem zu sein scheint. Darum hast du also vorsorglich gar nicht erst an 39 gedacht. Sehr gut...

D: Ja...genau...


45:

K: Das ist zwar groß, aber nicht wichtig. Schwarz und Weiß stehen beide oben recht solide, so dass es dort nur um Gebiet geht. Schwarz sollte 45 am unteren Rand spielen, um zum Beispiel mit einem Tobi auf J3 seine Gruppe zu verstärken. Wenn Weiß 45 einfach ignoriert und selber dort spielt, muss Schwarz wohl verteidigen, immerhin hat die ganze Gruppe noch keine Augen.
.
.
.
46:

K (entsetzt): Mal wieder schwacher Kampfgeist!
45 ist ein overplay. Überall stehen nur schwarze Steine!- Hast du überhaupt über 47 in Var4 nachgedacht? Nach 51 steht Weiß auf verlorenem Posten!

D (verlegen): Nein...natürlich nicht...

K: Streng dich ein bisschen mehr an! Kämpf ein bisschen mehr, sonst wirst du nicht stärker.


Dia 2:

51:

K: Schon wieder ! 50 war ein schwacher Zug, warum schneidest du denn nicht einfach auf 54?

D: Der weiße Stein rechts hat noch eine Menge Aji und außerdem führe ich doch ohnehin schon...

K: Kämpfe einfach, wenn du stärker bist. Mach es einfach!

54-55:

K: W54 ist lächerlich und du antwortest auch noch mit 55! Denst du, dass das Gebiet rechts groß ist?

D: Naja..schon. Immerhin verschwindet das Aji des weißen Steins rechts und...

K (schmeißt die schwarzen Steine rechts vom Goban): Was willst du denn damit? Das ist nichts! Wertlos! Die beiden Gruppen von Weiß, rechts unten und im Zentrum sind beide stark! Wieso willst du zwei starke Gruppen voneinander trennen, während du deine Gruppe unten, die noch keine zwei Augen hat, vernachlässigst??


56-68:

K: Wieso verbindest du mit 57? Dieser Stein ist doch gar nicht wichtig, weil die weiße Gruppe im Zentrum sowieso schon stark genug ist. Auf diese Weise kann Weiß mit der Sequenz bis 68 zwei Steine fangen. Was ist dir wichtiger, der eine nutzlose oder die beiden wichtigen Steine?

D: Natürlich sind die zwei Steine wichtiger...

K: Dann solltest du flexibler antworten! Zum Beispiel mit Var.5. Danach behälst du dein Gebiet und rettest die markierten Steine, während Weiß nur den einen unwichtigen Stein beommt.


69:

K: Weißt du, der Goban endet nicht in der Mitte. Du musst auf das GANZE Brett achten ! -Mit 69 hättest du endlich Sente nehmen und unten verstärken sollen. Am Besten mit 72, das macht Miai aus A und B.

73:

K: Was!? Du solltest unten spielen!!

D: Ich dachte, dass es okay ist, den großen Punkt oben mitzunehmen, wenn ich unten nur leben kann.

K: Und wenn die Gruppe unten stirbt? Dann gewinnt Weiß!

D: Ich sterbe aber unten nicht!

K: Sicher?

D: Wahrscheinlich....

K: Okay. Ich töte dich! ( Per Blitzgo entstand die Variante rechts, es dürfte tatsächlichs schwer sein, hier zwei Augen zu machen. Leider haben wir über die Stellung nach 74 nicht wirklich diskutiert, es ging nur darum, mir zu zeigen, dass es nicht reicht, sich über Leben und Tod einer Gruppe "halbwegs" sicher zu sein und dass man wichtige vor großen Zügen spielen sollte.)

76:

K: Hoffnungslos.

79-87:

K: Es wäre wohl besser, wie in Var. 7 zu schneiden. Du hast mit 73 oben schon genug profitiert. Insgesamt hast du oben rechts wohl um die 80 Punkte. Das bedeutet, dass du nicht unbedingt alles retten musst. Wenn Weiß also tatsächlich mit 82 darauf bestehen sollte, vier Steine zu fangen, kannst du mit 83 auf Garantie mit einem Teil der Gruppe leben.

Y: Dazu kommt, dass du unten rechts nie und nimmer genug Platz für zwei Augen hast -wahrscheinlich nicht mal eins. Wenn du wie in der Partie mit 87 in Gote endest, dann wird es langsam wirklich gefährlich für Schwarz.

K: Oi Kuma! (Eigentlich heißt der andere junge Profi wohl Yuho, aber Kenmochi nennt ihn immer "Bär" ich weiß nicht warum) Meinst du wirklich, dass Schwarz unten rechts nicht mal ein einziges Auge machen kann?

Y: Also wenn überhaupt, dann wohl mit einem Tsuke auf 90...

K: Ja. Das sieht nach einem Tesuji aus. Aber was passiert, wenn Weiß wie in Var. 8 schneidet?

I (ein anderer Insei in der Studiengruppe): Dann wäre wohl 95 in Var.8 das Tesuji. Danach fängt Schwarz entweder zwei weiße Steine oder sogar die ganze Gruppe rechts.

K: Stimmt. Also kann Weiß nicht schneiden und Tsuke auf 90 ist wirklich ein guter Zug. Sehr gut Kuma.

88:

K: Nicht gut genug. Weiß muss diese Gruppe töten, wenn er gewinnen will, also ist ein stärkerer Angriff nötig, beispielsweise mit 88 auf 99.

89:

-allgemeines Aufstöhnen bei den Profis-

91-92:

K: Wieso spielst du 91? Weiß muss nicht unbedingt mit 92 darauf antworten! 91 gibt Weiß vielmehr die Chance, mit einem Nobi auf 93 seinen versäumten Angriff nachzuholen. Statt 91 wäre ein Tobi auf 99 vielleicht ein guter Zug, weil in dieser Richtung noch viel Platz ist -Platz zum Augen bauen.

Y: Zum Glück hat Weiß auf 92 geantwortet. Damit dürfte Schwarz wohl leben können.

99:

K: Das ist wieder dasselbe. Du solltest noch etwas schneller und leichter davonrennen, C ist dafür ein guter Zug. Wenn Weiß 100 auf C spielt, ist die Schwarze Gruppe immer noch nicht lebendig!

105:

K: Schlecht. Die Form ist schlecht und außerdem kann Weiß jetzt seinen Angriff fortsetzen. Was wäre denn zum Beispiel mit dem Hane in Var.9 ? Ist das klein?

Y: Nein. Das ist ein cleverer Zug. Wenn Weiß mit A antwortet, kann Schwarz ein Auge machen. Also wird Weiß wohl auf B antworten -damit ist das Hane eine gute Vorhand.
Hat denn die Gruppe am Ende gelebt?

D: Ja. Ich hab mir nie Sorgen darüber gemacht ;)

-B+res-

Montag, 12. Januar 2009

Real Game Tsumego 3

Hey there!
Sorry, I have not been very active here recently but now I will show you another interesting problem, which occured in one of my Insei-games.


Dia 1:


This position occured in one of my games during the last weekend. The marked group of black stones on the left side seems to be dead. If White can kill this group he will win the game for sure.
Let's find a way to do something here.


Dia 2: Directly trying to live is not going to work.

Of course you will have noticed by now, but in order to make sure that everybody understands why the group on the left looks dead locally I will add this diagram.
If Black plays 1, White will counter with 2, Black can't connect at A because of a lack of liberties. Therefore when Black captures at B, White will take his second eye with A.


Dia 3: Aiming for Whites shortage of liberties


The Sagari in this diagram is a nice move. Now White is just a little short of liberties, so he has to begin to capture the two black stones with 2 here. After this 3 is a great Tesuji for making life with the main group.


Dia 4: Whites failure:


If White simply continues to take Blacks liberties, Black can force with 2 and 4. If Withe after this captures at A, Black can live unconditionally with B.

Can White do any better than this ?-


Dia 5: Best plays for both sides


To make a long story short: The best White can do is to start a Ko with the combination of 1 and 3. Still this Ko is pretty dangerous for White, because Black will take first.

Note that White 1 on 2 will not work as White will only have three liberties in this case, leading him to lose the Semiai.